I spent the previous evening, thinking about my carving and planning what to carve out today during the workshop. I would like to make more prints on paper of favorite images (I'm thinking food and quotidian objects of every day living) and perhaps sell and gift them. I know I've already got a small brayer at home, and I've already got an online shopping cart filled with 12" x 12" battleship gray linoleum, unmounted (no need to go crazy and order beyond what I can accomplish in the near future); a baren; linocutter set; and a jar of water-soluble black block printing ink. I know I want to refine a design for a pottery stamp for Kraft paper shopping bags, and perhaps fill in negative spaces with acrylic paint by hand.
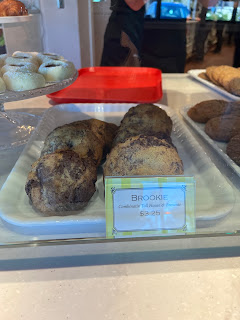
Back to class. Though first, I had to go to Gayle's Bakery. I needed a sandwich for lunch and then got Patrick his desserts. My husband had asked me to get him a Chocolate Coma Cookie, but I thought he'd also like the Brookie, a hybrid of a brownie and a Toll House chocolate chip cookie.
Gayle's Bakery was quite the hub of activity. I placed an order for an Italian panini (alas the bakery was out of the vegan BLT I wanted), the two cookies, and a loaf of the Capitola Sourdough, sliced. I looked longingly at a dessert I would've ordered if I thought it wouldn't melt and perish in my car.
On to Cabrillo College.
In class, Melissa demonstrated printing a multi-layer of colors. You can print two colors on the same linocut block, and create an ombre effect by rolling the brayer on the two colors.

Yesterday Melissa showed us how to use these mat frames as the registration guide for the paper--centering the block on the paper to be printed and then measuring and penciling notes on the guidelines for centering the block on a the paper to be inked on. The blue tape keeps the registration of the prints.
And the two colors of red and yellow even overlapped a bit to create a third color of orange on the print, which is so lovely. I would love to carve palm trees and then overlay those black outlines over a blazing sun-filled sky.
And Melissa then adhered a third color on a second block--the blue background for the night time sky. Note to self: print the smaller blocks of color first before overlaying the black outlines on my own linocut blocks.


And then the moment of truth: the print. Because the ink was magenta red, Melissa had me add a bit of yellow to make a true red.
I made 5 prints and was already disappointed by the second block, and that was okay because I just wanted the practice at printing.
While on break, getting some sunshine and eating my lunch, I explored the ceramics garden and photographed my favorite tiles on a concrete bench.
I especially enjoyed the food-themed and quirky tiles.
Back in the design studio, I could tell already that the stitch lines were too fucking clumsy. But I know now how I'm going to tackle the re-do.
And here are the professional grade inks that we used. I’m now noticing after reading online a bit about printing inks that these are Caligo safe wash oil-based inks, meaning that the ink will be permanent but will dry after a few days and the safe wash means they can be washed from the brayer and plate with soap and water.

Lastly I appreciated the examples from past students that Melissa shared at the beginning of class. I am inspired by this suggestion of air currents on water generated by the helicopter.

And check out the air currents of flames from a burning house in the night. But my absolute favorite is "Early Morning" because of the play of a rising sun and the shadows it casts in the windows of a kitchen.
The glacial atmosphere of a modern barn and cabin on the edge of a forest is pretty darn cool too. And I had to admire the fine details of the octopus block carved by Melissa.
Having learned enough, I left class an hour early to come home to cook ham and macaroni and cheese and sautéed cauliflower and cabbage for dinner.
Should I ever get the impulse to buy a slab of meat or roast of some sort, I need to squash that urge right away though I did manage to share a lot of the ham with Cecilia and Nancy. Tonight I used the rest of the steak and half an avocado to cook tacos after I quick pickled a batch of jalapenos.
After eating my first two tacos, I realized I forgot to add cilantro. Still hungry, I ate more tacos but remembered to add cilantro.
I love that I could re-work leftovers into a delicious meal.
Tomorrow's leftovers will be grits and leftover marinara, and so the plan is to cook meatballs in the marinara and top it on the polenta.
 Lastly I appreciated the examples from past students that Melissa shared at the beginning of class. I am inspired by this suggestion of air currents on water generated by the helicopter.


No comments:
Post a Comment